How to Configure OpenAM Signing Keys

Contents
The exchange of SAML assertions between an Identity Provider (IdP) and a Service Provider (SP) uses Public-key Cryptography to validate the identity of the IdP and the integrity of the assertion.
Securing SAML Assertions
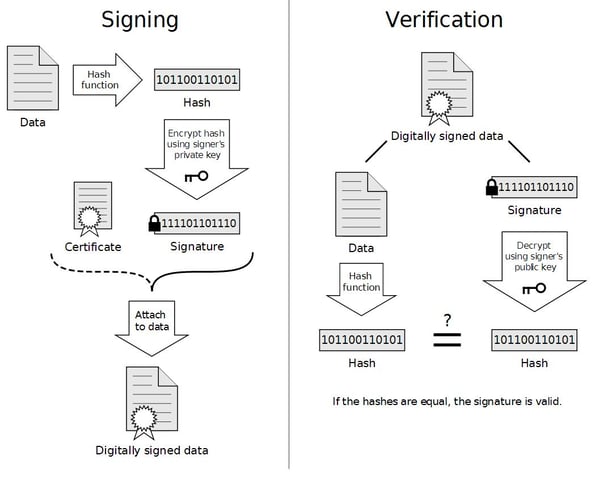
SAML assertions passed over the public Internet will include a digital signature signed by an Identity Provider’s private key. Additionally, the assertion will include the IdP’s public key contained in the body of a digital certificate. Service Providers receiving the assertion can be assured that it has not been tampered with by comparing the unencrypted (hashed) message obtained from the digital signature with a hashed version of the message created by the Service Provider using the same hashing algorithm.
The process can be demonstrated by the following diagram where the Signing process is performed by the IdP and the Verification process is performed by the SP. The “Data” referred to in the diagram is the assertion and the “Hash function” is the hashing algorithm used by both the Identity Provider and the Service Provider.
In order for an Identity Provider to sign the assertion, they must first have a digital certificate.
OpenAM includes a default certificate that can use for testing purposes. This certificate is common to all installations and while convenient, should not be used for production deployments. Instead, you should either use a certificate obtained from a trusted certificate authority (such as Thawte or Entrust) or generate your own self-signed certificate.
Note: For the purposes of this article, $CONFIG refers to the location of the configuration folder specified during the installation process. $URI refers to the URI of the OpenAM application; also specified during the installation process (i.e. /openam).
OpenAM’s Default Signing Key
OpenAM stores its certificates in a Java Keystore file located in the $CONFIG/$URI folder by default. This can be found in the OpenAM Console as follows:
- Log in to the OpenAM Console as the administrative user.
- Select the Configuration tab.
- Select the Servers and Sites subtab.
- In the Servers panel, select the link for the appropriate server instance.
- Select the Security tab.
- Select the Key Store link at the top of the page.
You will see that the default location for the Java Keystore file, all passwords, and the alias of the default test certificate as follows:
Viewing the Contents of OpenAM’s Default Certificate
You can view the contents of this file as follows:
- Change to the $CONFIG/$URI folder.
- Use the Java keytool utility to view the contents of the file. (Note: The contents of the file are password protected. The default password is: changeit)
# keytool –list –keystore keystore.jks
Enter keystore password: changeit
Keystore type: JKS
Keystore provider: SUN
Your keystore contains 1 entry
Alias name: test
Creation date: Jul 16, 2008
Entry type: PrivateKeyEntry
Certificate chain length: 1
Certificate[1]:
Owner: CN=test, OU=OpenSSO, O=Sun, L=Santa Clara, ST=California, C=US
Issuer: CN=test, OU=OpenSSO, O=Sun, L=Santa Clara, ST=California, C=US
Serial number: 478d074b
Valid from: Tue Jan 15 19:19:39 UTC 2008 until: Fri Jan 12 19:19:39 UTC 2018
Certificate fingerprints:
MD5: 8D:89:26:BA:5C:04:D8:CC:D0:1B:85:50:2E:38:14:EF
SHA1: DE:F1:8D:BE:D5:47:CD:F3:D5:2B:62:7F:41:63:7C:44:30:45:FE:33
SHA256: 39:DD:8A:4B:0F:47:4A:15:CD:EF:7A:41:C5:98:A2:10:FA:90:5F:4B:8F:F4:08:04:CE:A5:52:9F:47:E7:CF:29
Signature algorithm name: MD5withRSA
Version: 1
*******************************************
*******************************************
Replacing OpenAM’s Default Keystore
You should replace this file with a Java Keystore file containing your own key pair and certificate. This will be used as the key for digitally signing assertions as OpenAM plays the role of a Hosted Identity Provider. The process for performing this includes five basic steps:
- Generate a new Java Keystore file containing a new key pair consisting of the public and private keys.
- Export the digital certificate from the file and make it trusted by your Java installation.
- Generate encrypted password files that permit OpenAM to read the keys from the Java Keystore.
- Replace OpenAM’s default Java Keystore and password files with your newly created files.
- Restart OpenAM.
The following provides the detailed steps for replacing the default Java Keystore.
1. Generate a New Java Keystore Containing the Key Pair
a) Change to a temporary folder where you will generate your files.
# cd /tmp
b) Use the Java keytool utility to generate a new key pair that will be used as the signing key for your Hosted Identity Provider.
# keytool -genkeypair -alias signingKey -keyalg RSA -keysize 1024 -validity 730
-storetype JKS -keystore keystore.jksEnter keystore password: cangetin
Re-enter new password: cangetin
What is your first and last name?
[Unknown]: idp.identityfusion.com
What is the name of your organizational unit?
[Unknown]: Security
What is the name of your organization?
[Unknown]: Identity Fusion
What is the name of your City or Locality?
[Unknown]: Tampa
What is the name of your State or Province?
[Unknown]: FL
What is the two-letter country code for this unit?
[Unknown]: US
Is CN=idp.identityfusion.com, OU=Security, O=Identity Fusion, L=Tampa, ST=FL, C=US correct?
[no]: yes
Enter key password for <signingKey>
(RETURN if same as keystore password): cangetin
Re-enter new password: cangetin
You have now generated a self-signed certificate but since it has been signed by you, it is not automatically trusted by other applications. In order to trust the new certificate, you need to export it from your keystore file, and import it into the cacerts file for your Java installation. To accomplish this, perform the following steps:
2. Make the Certificate Trusted
a) Export the self-signed certificate as follows:
# keytool -exportcert -alias signingKey -file idfSelfSignedCert.crt -keystore keystore.jks
Enter keystore password: cangetin
Certificate stored in file <idfSelfSignedCert.crt>
b) Import the certificate into the Java trust store as follows:
# keytool -importcert -alias signingKey -file idfSelfSignedCert.crt -trustcacerts
-keystore /usr/lib/jvm/java-7-oracle/jre/lib/security/cacertsEnter keystore password: changeit
Owner: CN=idp.identityfusion.com, OU=Security, O=Identity Fusion, L=Tampa, ST=FL, C=US
Issuer: CN=idp.identityfusion.com, OU=Security, O=Identity Fusion, L=Tampa, ST=FL, C=US
Serial number: 34113557
Valid from: Thu Jan 30 04:25:51 UTC 2014 until: Sat Jan 30 04:25:51 UTC 2016
Certificate fingerprints:
MD5: AA:F3:60:D1:BA:1D:C6:64:61:7A:CC:16:5E:1C:12:1E
SHA1: 4A:C3:7D:0E:4C:D6:4C:0F:0B:6B:EC:15:5A:5B:5E:EE:BB:6A:A5:08
SHA256: A8:22:BE:79:72:52:02:6C:30:6E:86:35:DA:FD:E0:45:6A:85:2C:FE:AA:FB:69:EA:87:30:65:AF:2E:65:FB:EB
Signature algorithm name: SHA256withRSA
Version: 3
Extensions:
#1: ObjectId: 2.5.29.14 Criticality=false
SubjectKeyIdentifier [
KeyIdentifier [
0000: 12 3B 83 BE 46 D6 D5 17 0F 49 37 E4 61 CC 89 BE .;..F….I7.a…
0010: 6D B0 5B F5 m.[.
]
]
Trust this certificate? [no]: yes
OpenAM needs to be able to open the truststore (keystore.jks) and read the key created in step 1. The private key and truststore database have both been locked with a password that you entered while configuring the truststore and signing key, however. For OpenAM to be able to read this information you need to place these passwords in files on the file system.
3. Generate Encrypted Password Files
Note: The passwords will start out as clear text at first, but will be encrypted to provide secure access.
a) Create the password file for the trust store as follows:
# echo “cangetin” > storepass.cleartext
b) Create the password file for the signing key as follows:
# echo “cangetin” > keypass.cleartext
c) Prepare encrypted versions of these passwords by using the OpenAM ampassword utility (which is part of the OpenAM administration tools).
# ampassword –encrypt keypass.cleartext > .keypass
# ampassword –encrypt storepass.cleartext > .storepass
Note: Use these file names as you will be replacing the default files of the same name.
4. Replace the Default OpenAM Files With Your New Files
a) Make a backup copy of your existing keystore and password files.
# cp $CONFIG/$URI/.keypass $CONFIG/$URI/.keypass.save
# cp $CONFIG/$URI/.storepass $CONFIG/$URI/.storepass.save
# cp $CONFIG/$URI/keystore.jks $CONFIG/$URI/keystore.jks.save
b) Overwrite the existing keystore and password files as follows:
# cp .keypass $CONFIG/$URI/.keypass
# cp .storepass $CONFIG/$URI/.storepass
# cp keystore.jks $CONFIG/$URI/keystore.jks
5. Restart the container where OpenAM is currently running.
This will allow OpenAM to use the new keystore and read the new password files.
Verifying Your Changes
You can use the keytool utility to view the contents of your Keystore as previously mentioned in this article. Alternately, you can log in to the OpenAM Console and see that OpenAM is using the new signing key as follows:
- Log in to OpenAM Console.
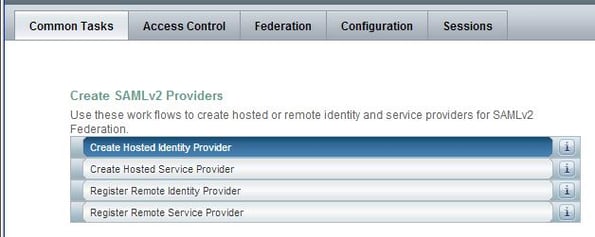
- Select the Common Tasks tab.
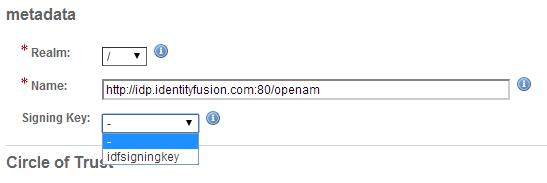
- Select the Create Hosted Identity Provider option beneath the Create SAMLv2 Providers section.
Verify that you now see your new signing key appear beneath the Signing Key option as follows:
You have now successfully replaced the default OpenAM Java Keystore with your own custom version.


